 I did a drop shadow around the inner edge of the background paper.
 I sponged the edges of the pattern paper
 and then I made a drop shadow where the next pattern paper will lie. I cut a section of the pp out so as not to waste it. It is going to be covered anyway.
Cut second piece of pattern paper and sponge outter edge.

Run a line of Stickles around outter edge of third pattern paper.

Run Stickels around the outside edge of frame piece.
 Cut a strip of black pattern paper and punch a scallop edge along one side. Also punch scallope squares out of various pattern papers to run across the scallop piece.
Cut out Flower Flourish from pattern paper.

gather up a piece of wire edged ribbon and attach it along the left hand side. I glued the string beads along the flower stem.

I really like the Zip Dry glue for this.

Cut and punch flowers from pattern paper and use rhinestones for centers.

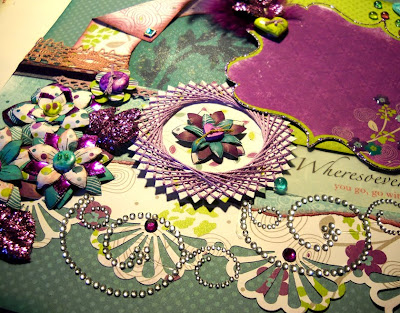
Close-Up.

Close-Up of beads.

I used Inkssentials, Enamel Accents, white and black to add dimension to the elements as well as Crystal Effects

Add rhinestones to the scallop edge.

I really like this view because you can see all the layers.

And one last close-up of this layout.

This is the second Layout I did.
Last week I found a new to me Sketch Designer from France. Her name is Angelique and you can find her blog and sketches Here. I used Sketch #2 for this. I can't wait for her to do some more. These are more of the Bo Bunny papers I bought. This is the Peacock Lane line.
Since I worked on this mostly at night the photos of the process are tinted with that yellow light that comes from photographing under artificial light. This first photo is what the colors are really like.

Cut circle from main pattern paper and punch lower edge and sponge edges with ink. Turn down upper left corner and sponge folded edge.

Mark in pencil the opening where the circle will be. Use a sponge and ink to color the inside of the circle.

Place pattern paper over the background.

As an after thought I decided to add a stenciled image inside the circle. I masked off all around the stencils with post-it-notes.

 Turn down upper left corner and sponge folded edge.
Mark in pencil the opening where the circle will be. Use a sponge and ink to color the inside of the circle.

Place pattern paper over the background.

As an after thought I decided to add a stenciled image inside the circle. I masked off all around the stencils with post-it-notes.

Sit back and take a look at all the pieces. You should start seeing other things you want to add.

Punch holes with 2 sizes of circle punches. Tear lower edge of piece of paper and then sponge the edge with ink.
 tape the back side of the paper with scotch tape or packing tape.
 sprinkle glitter to front side of tape an rub it into the tape before removing excess.
 Apply Stickles to outter edge of frame piece.

Apply lace, ribbon and lace to lower left side.

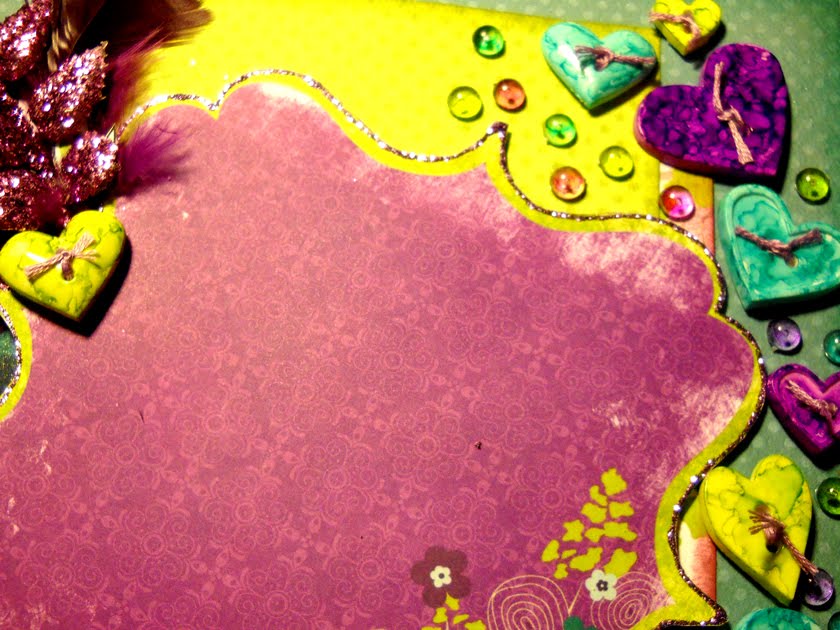
Add purple glitter ribbon on right side and add a piece of green dot paper.

color white buttons and small plastic pieces with Alcohol Inks.
 Cut circle from pattern paper with Spellbinders (small pinking circles) and then wrap the outer edge with embrodiery thread.
 Add a small flower to the center.

The flowers are punched and cut from pattern paper. Some of the pieces are printed from Fred She Said flowers. Buttons and beads turn the flowers into flower faces.

Add feathers and buttons and some glitter covered leaves. I found these in the Christmas picks at Michaels last fall.


Punch holes with 2 sizes of circle punches. Tear lower edge of piece of paper and then sponge the edge with ink.
 tape the back side of the paper with scotch tape or packing tape.
 sprinkle glitter to front side of tape an rub it into the tape before removing excess.
 Apply Stickles to outter edge of frame piece.
Apply lace, ribbon and lace to lower left side.

Add purple glitter ribbon on right side and add a piece of green dot paper.

color white buttons and small plastic pieces with Alcohol Inks.
 Cut circle from pattern paper with Spellbinders (small pinking circles) and then wrap the outer edge with embrodiery thread.
 Add a small flower to the center.
The flowers are punched and cut from pattern paper. Some of the pieces are printed from Fred She Said flowers. Buttons and beads turn the flowers into flower faces.

Add feathers and buttons and some glitter covered leaves. I found these in the Christmas picks at Michaels last fall.

Add buttons and colored plastic pieces down the right side. More Buttons

Add some crystal effects to the flowers on the frame piece.
 A little bit of bling and a few rhinestones.
A Vellum Quote.

 More Buttons
Add some crystal effects to the flowers on the frame piece.
 A little bit of bling and a few rhinestones.
A Vellum Quote.

One last close-up.This is what the colors really look like

Have a great evening and come back tomorrow for the Bugaboo blog Hop and A New Challenge.
1 comment:
Hi Melissa, thanks so much for letting me know that you used one of my sketches, I appreciate that a lot!
Your layout is amazing, so pretty, so girly, so gorgeous, I just love how you have showed your steps and I love how you used that gorgeous paper - I think I NEED that paper.
I just love all the flowers and bling - just beautiful work.
Both layouts are devine, thanks for sharing and I look forward to you using more of my sketches!
Post a Comment